Perhaps the most interesting aspect of Dolby’s object-based Atmos immersive format is its ability to adapt to the listener’s setup, scaling all the way from binaural playback over headphones to twelve speakers or more!
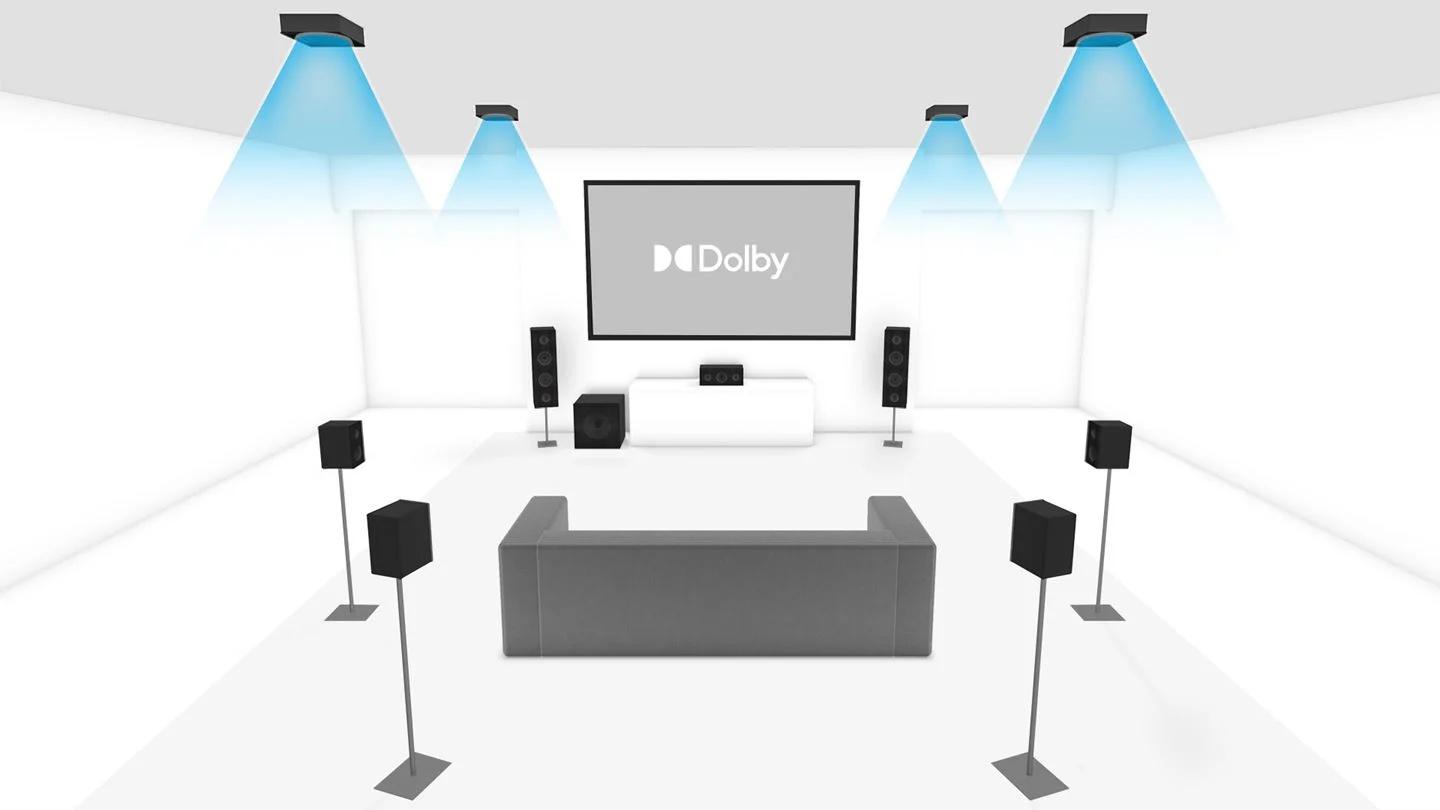
However, it would appear that most Atmos music mixes (including those by immersive mixing wizards Steven Wilson and Bruce Soord) are created on 7.1.4 arrays: seven floorstanding speakers at ear level, one subwoofer, and four height speakers. Though 5.1.2 or 5.1.4 playback absolutely can yield optimal results, I’d argue that more closely matching the mixer’s layout will ensure that the listener fully comprehends all the spatial positioning decisions.
Case in point, Bob Clearmountain’s Dolby Atmos remix of The Band’s Cahoots (1971) often divides elements such as horns and guitar between the side and rear surround channels for a full ‘arc’ of rear activity around the listener. When played back in 5.1.4 or even standard 5.1, those four discrete channels are combined into a single stereo pair behind the listener.
I’ve also often found there to be extended passages of panning or swirling around the ceiling quad array, such as with the electric guitar solo at the end of “Smoke Signal” in the aforementioned Cahoots or with the keyboards in “My Demons” from Steven Wilson’s Atmos mix of Tears For Fears’ The Tipping Point (2022).
Unfortunately, AVRs with enough amp power to drive 12 discrete channels cost upwards of $3,000 (examples include the Yamaha Aventage RX-8A8 or Marantz AV-7706). Below, I’ve outlined an alternative route to 7.1.4 that can run well under $1,000, especially if you’ve already got a 5.1 or 7.1 setup.
Software
The one piece of software required for this process to work on is the Dolby Reference Player, an advanced media player intended for quality-control/testing of Dolby Atmos mixes at the professional level. The Reference Player will output up to 9.1.6 channels of Atmos in both lossless (Dolby TrueHD) and lossy (Dolby AC-4) flavors. It also features individual solo and mute buttons for each channel, allowing one to analyze the content of each speaker in an Atmos mix.
Unfortunately, the unprecedented flexibility of this media player comes at a price: $400 USD. This may seem high for a software player (especially with the availability of freeware options for 5.1/7.1 such as Foobar2000 or VLC Media Player), but it’s a value when compared with similar hardware options as noted above. You’ll also need to get familiar with MacOS’s built-in “Audio MIDI Setup” menu.
Hardware
Aside from the twelve speakers and necessary amplification to drive them, you’ll need some kind of USB-based recording/mixing interface with line outputs to route audio to the height speakers.
For my personal setup, I purchased the following pieces of equipment second-hand using online marketplaces such as eBay and USAudioMart.
- 2014 Mac Mini with MacOS Monterey upgrade ($150)
- Yamaha RX-V665 7.2-Channel AVR ($120)
- Pioneer VSX-D411 5.1-Channel AVR ($60)
- Behringer UMC404HD 4-Channel USB Interface ($150)
- Paradigm Atom V3 Bookshelf Speakers (average $60 per pair)
- Polk Audio Monitor XT90 Height Speakers ($200 per pair)
Setting Up An Aggregate Audio Device
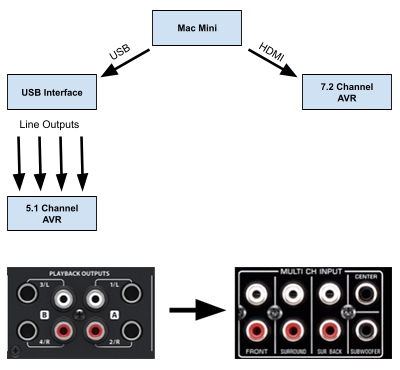
Though there are a number of USB interfaces out there that feature 12 or more line outputs, such as the Focusrite Red 16Line unit (which is designed for Atmos monitoring at the professional level), the cost can be prohibitive. A simpler (and significantly more-inexpensive) solution is to start with a 7.2-channel AVR and add the four additional channels via an external USB interface, such as Behringer's UMC404HD. The line outputs on said interface can then feed a second 5.1-channel AVR, which powers the height speakers. For Mac users, it’s relatively simple to mix-and-match multiple HDMI or USB external devices into an “aggregate audio device” using Audio MIDI Setup.
After placing and connecting all twelve speakers to both AVRs (hiding all the speaker wire can definitely be a challenge!), the first thing you’ll need to do is connect the 7.1 AVR to your Mac via HDMI and the Behringer recording interface via USB. Then, connect the Behringer’s four RCA line outputs to the 5.1 AVR’s analog multi-channel input.
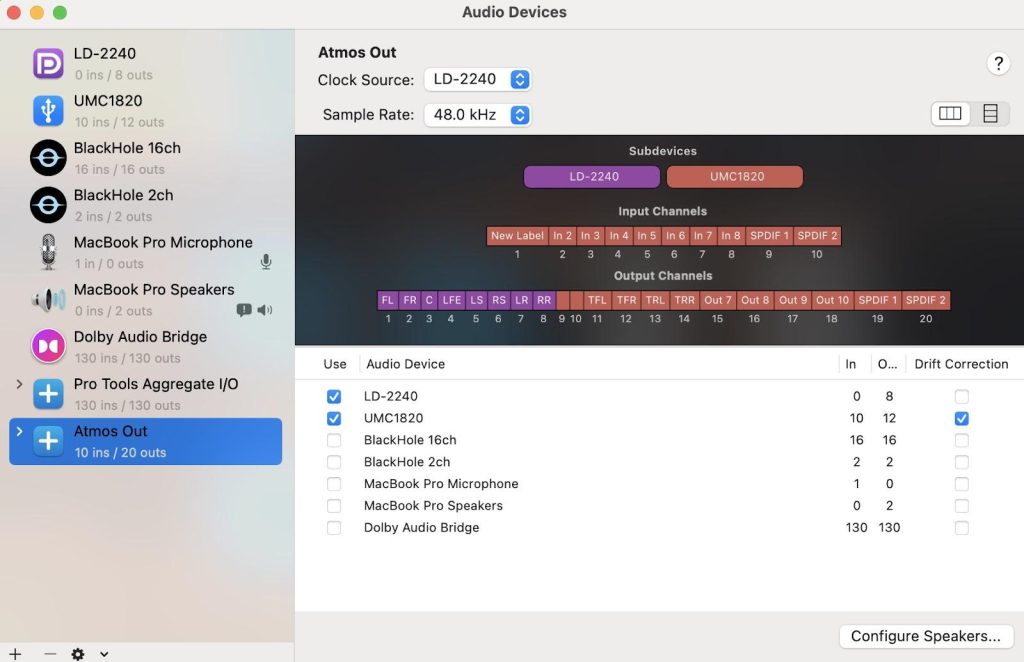
In the Audio MIDI Setup menu, you should see the 7.1 AVR and Behringer interface as separate audio devices. The Behringer will likely be named, whereas the AVR will be seen as a generic HDMI output. Set both devices to their maximum number of output channels (eight for the AVR and four for the Behringer) and select 48-khz/24-bit as the sample rate/bit depth.

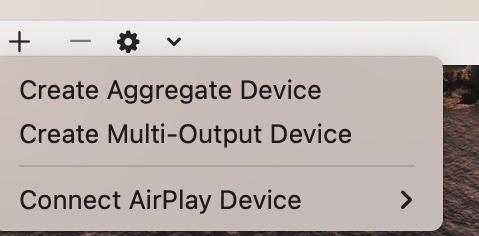
Next, click “create aggregate device” in the bottom left-hand corner. I labeled my aggregate device “Atmos Out,” but you can name it anything you’d like.
You may also want to label the output channels to avoid confusion, as pictured below. I’d recommend using the AVR as the clock source (this makes the AVR the “master” and the USB interface the “slave” with regards to word clock synchronization).
Finally, click “configure speakers” on the bottom right-hand corner and configure the aggregate device for 7.1.4 Dolby Atmos. Note that support for Dolby Atmos in both 5.1.2 and 7.1.4 configurations is limited to MacOS Monterey. You should now be able to determine all twelve channels are mapped correctly with bursts of white noise from the “test” function.

I suspect the question many readers may have at this point is “does this work on PC?” and the answer is most likely yes, but only if one is using a third-party audio driver such as ASIO4ALL to create an aggregate device. Unfortunately, Windows does not natively support aggregate audio devices.
Configuring The Dolby Reference Player
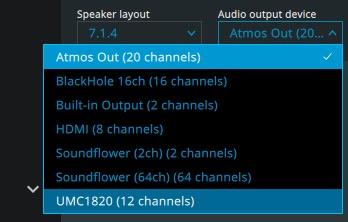
Now that your “Atmos Out” aggregate device is ready, open the Dolby Reference Player and select it as your output (bottom right-hand corner).
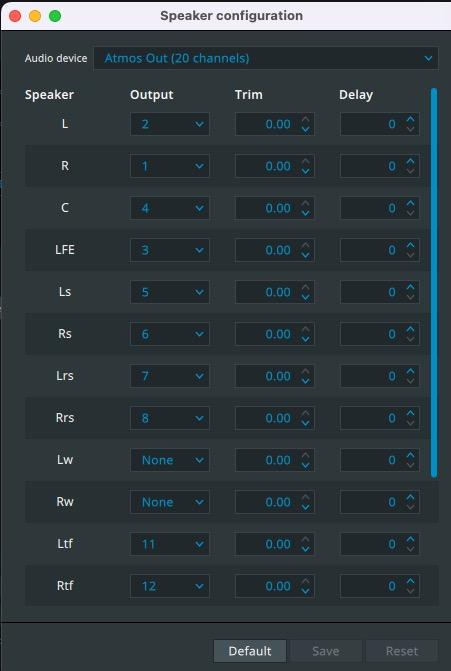
Then, click “window” in the top left-hand corner and select “speaker configuration” in the drop down menu. You’ll then need to assign your outputs from Audio MIDI Setup in their proper locations (this is where the labeling in Audio MIDI Setup comes in handy!)
Now, you’re ready to play back a Dolby Atmos file. The Reference Player accepts lossy AC-4 content in the form of .ec3 files and lossless TrueHD content in the form of .mlp files. Generating .mlp files from a Blu-Ray disc or MKV file is a relatively complex process unto itself, but fortunately it can be done using the freeware MakeMKV and MKVCleaver software packages.
Pros & Cons
Pros:
- Considerably lower cost than a 7.1.4-compatible AVR
- Since the Atmos decoding is done through the software, you can use any combination of older amplifiers or AVRs to drive your speakers
- The Dolby Reference Player can drive up to a 9.1.6 array, more channels than any current AVR model supports
Cons:
- You’ll need to manually balance the output volume of two amplifiers (fortunately, the Reference Player has a global volume control for all channels - so the amp levels should be case of ‘set it and forget it’)
- Only MacOS offers native support for aggregate audio devices
Conclusion
For listeners such as myself that want the full 7.1.4 experience without having to trade up for an expensive new AVR, the ability to decode Atmos content into multichannel PCM via software is a game changer.